In the digital age, images play a pivotal role in our online experiences. Whether you’re designing a website, sharing photos on social media, or sending pictures in emails, inserting your logo in the email signature, choosing the right image format is crucial. Sharing the photo on social media is difficult as JPG images do occupy space on the drive. Convert JPG images to PDF format and compress image files. Combine images into PDF and share files on social media.
Two of the most commonly used formats are JPEG (Joint Photographic Experts Group) and PNG (Portable Network Graphics).
But which one should you use, and when? In this blog, we’ll explore the differences between JPEG vs. PNG, their strengths and weaknesses, and help you make an informed decision.
Understanding JPEG

JPEG, often pronounced as “jay-peg,” is a widely used image format designed for photographs and images with complex color gradations. Taking a photo with your smartphone or digital camera is often saved as a JPEG.
It uses a lossy compression algorithm, reducing file sizes by discarding some image data. The primary advantage of JPEG is its ability to reduce the file size while maintaining good image quality, making it ideal for web usage and digital photography.
When to Use JPEG?
Now that we understand the strengths and weaknesses of both formats let’s discuss when it’s best to use JPEG:
Photographs: JPEG is the go-to format for photographs. Its lossy compression is less noticeable when applied to images with complex color gradients and fine details.
Web Images: For images on websites where small file sizes and fast loading times are essential, JPEG is often the preferred choice. It balances decent quality with smaller file sizes.
Photo Sharing: When sharing photos on social media or via email, JPEG is a reliable option due to its widespread compatibility and manageable file sizes.
Printing: If you plan to print an image, especially if it’s a photograph, JPEG is a suitable choice. Ensure you save a high-quality version with minimal compression to maintain print fidelity.
Pros of Using JPEG:
- Small File Sizes: JPEG files are known for their small file sizes, making them ideal for web use and sharing on social media. Smaller files load faster on websites, ensuring a better user experience.
- Wide Compatibility: JPEG is supported by virtually all devices and software, making it a universal image-sharing choice.
- Photographic Detail: JPEG reproduces photographs and images with smooth color transitions. It’s particularly well-suited for images with various colors and shades.
Cons of Using JPEG:
- Lossy Compression: While lossy compression reduces file size, it also leads to a loss of image quality. The more you compress a JPEG image, the more quality it loses. This makes it less suitable for images where preserving fine details is essential. This can result in visible artifacts like blurriness and color banding.
- No Transparency: JPEG doesn’t support transparency, so it’s not ideal for images with transparent backgrounds.
- Not Ideal for Text or Graphics: Due to its lossy nature, JPEG is not the best choice for images containing text, sharp lines, or simple graphics. These can appear pixelated or jagged when saved as JPEGs.
Understanding PNG

PNG, pronounced as “ping,” is another popular image format with several advantages over JPEG. It uses a lossless compression algorithm, reducing file sizes without sacrificing image quality.
This format was created as an improvement over the older GIF format. Hence, it’s well-suited for images that require high-quality preservation, such as graphics, icons, and transparent images.
When to Use PNG?
PNG is a versatile format with its own set of ideal use cases:
Logos and Graphics: When you need to preserve the crispness of text, sharp lines, and simple graphics, PNG is the way to go. It’s perfect for logos, icons, and any image containing vector-like elements.
Web Images:
For Web Images: Most websites use the WebP format for their web images, which is
generally acceptable. However, if there is a requirement for an image with lossless
compression and support for a transparent background, converting from WebP to PNG is
necessary.
Images with Transparency: PNG is the format to choose when you need to maintain transparent backgrounds or create images with irregular shapes that blend seamlessly with different backgrounds.
Images for Professional Work: PNG offers a lossless option for professional graphic design work, where image quality is paramount. It ensures that your graphics and artwork look their best.
Archiving Images: If you want to archive images without any loss of quality for future editing or reformatting, PNG’s lossless compression ensures that your original data remains intact.
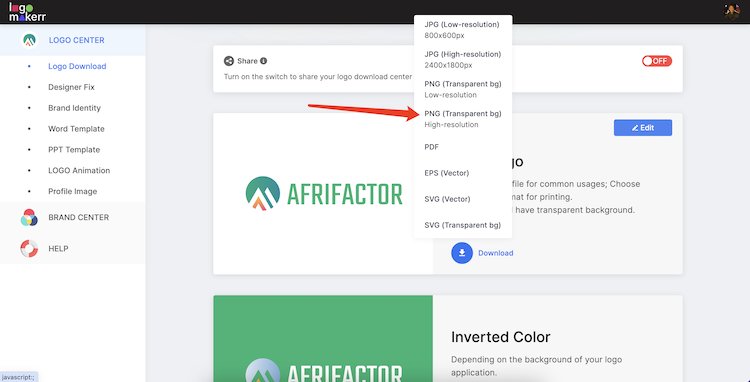
Pros of Using PNG:
- Lossless Compression: PNG retains the original image quality while reducing file sizes. This makes it ideal for images that preserve fine details and sharp edges, such as logos and graphics.
- Transparency: PNG supports transparent backgrounds, allowing you to create images with irregular shapes or overlay images seamlessly on different backgrounds.
- Crisp Text and Graphics: PNG is well-suited for images containing text, sharp lines, and simple graphics. It maintains clarity without pixelation or distortion.
- Wide Color Range: PNG supports a wide range of colors and can display images with high color accuracy.
Cons of Using PNG:
- Larger File Sizes: Compared to JPEG, PNG files tend to be larger, which can result in slower website loading times and increased storage requirements.
- Limited Color Depth: PNG’s 24-bit color depth may not be sufficient for images requiring millions of colors, like high-resolution photographs. In such cases, JPEG may be a better choice.
- Less Compatibility with Older Software: While PNG is supported by most modern software and devices, older applications and browsers may need more support for this format.
Making the Right Choice: JPEG vs. PNG

Now that we’ve explored the strengths and weaknesses of both formats let’s delve into some practical scenarios to help you decide which format to use between JPEG vs. PNG:
Consider the Content.
Think about the type of image you’re working with. Is it a photograph with complex colors, or does it contain text and graphics? Choose the format that best suits your content because taking a look between JPEG vs. PNG can be quite difficult.
Think About Usage.
Where will the image be used? JPEG may be preferred if it’s for the web or social media, where smaller file sizes are crucial. For professional design or images requiring transparency, PNG is the better option. All in all, a JPEG vs. PNG battle might be between you and your design!
Compression Settings.
When using JPEG, be mindful of the compression settings. Higher compression levels result in smaller files but can sacrifice image quality. Adjust the settings to find the right balance between JPEG vs. PNG.
Testing and Comparison.
When in doubt, it’s a good practice to save your image in both formats and compare them on JPEG vs. PNG. This lets you visually assess which format works best for your specific image.
Stay Open to Hybrid Solutions.
In some cases, using a combination of JPEG vs. PNG formats can be beneficial. For example, you can use JPEG for photographs and PNG for logos or graphics on the same webpage. HEIC to JPG converter Windows 10 is another option you can consider, especially if you have HEIC images from Apple devices that need to be converted to JPG for use on Windows 10
Conclusion

There is no one-size-fits-all answer in the ongoing debate of JPEG vs. PNG. The choice between these image formats depends on your specific needs and the context in which you use the images.
JPEG is excellent for photographs and web use, offering smaller file sizes and good quality. On the other hand, PNG is ideal for graphics, logos, and images that require transparency or lossless quality.
Remember that both formats of JPEG vs. PNG have their place in digital imagery, and your decision should align with your project’s requirements. Sometimes, you can use both formats within the project to optimize image quality and file sizes.
By understanding the strengths and weaknesses of each format and considering your project’s requirements, you can make informed decisions that result in the best image quality and user experience, as well as design the perfect logo for your brand!
